
After a short trip away from home, we found our chili plant sad and t
thirsty in our apartment.
I thought it might be nice to see the recovering in faster speed. I took every 15 sec a picture for nearly two hours.
After a short trip away from home, we found our chili plant sad and t
thirsty in our apartment.
I thought it might be nice to see the recovering in faster speed. I took every 15 sec a picture for nearly two hours.
Recently we were going to ski at Stuhleck in Austria. Or, better my girlfriend went skiing and I went to time lapse and HDR shots… I took three time lapses and some HDR shots. Two of the videos where really nice, the third went to crap because of two reasons. First, before setting up the camera to record I didn’t check about the memory card. I recorded my footage and went with the other camera around the mountain, after I cam back I noticed the memory were full. And second, I tried to photograph trough a hole in a tree, covered in snow, to have the sun moving on the sky. Nice idea but even with HDR everything was white and blur. Also the tree was moving a lot… Anyway here are the first two lapses in one Video.
For the HDR processing I used Luminance HDR 2.4.0 and, as usual, After Effects for processing the Video. I also tried to make some processing on two pictures for uploading to 500px but the rating was poor. A single picture I have to say looks boring but the moving clouds and light on the ground looks nice in the video.
Yesterday I thought, enough with work, let’s go photographing! But the questions were: what? how? After a bit of sitting around I remembered the tutorial from gwegner.de (by the way, a really good site for tutorials and information) for hyper lapses. This video is in German, but here is also a nice one in English from digitalrev.com.
Basically, with every picture you move with the camera along an imaginary line and take a picture while aiming at the same spot on every picture. As described in the videos, you should use marks are already present, like stones on the ground or just use your step span. In any case this will produce a bit shaky footage, but this can be corrected in after effect. If you shoot in the night, and the are no clouds or stars visible, like in my video, the interval between the pictures is not important. But if you have something in the screen with a steady movement, like clouds, then use a intervalometer. In this video there is a very good description of that. Anyway, in my case i was just going a step forward, point, shoot, step forward, point, shoot…. 250 times. And done. The camera settings were 3.2 s exposure, f/4.5, ISO 100.
After that you have your footage, but this is really shaky. It is impossible to align the camera and the rest completely! But for this there is Adobe After Effects, if you have money, or Deshaker for Virtual Dub, if you don’t have money or just like Open-Source. In any case, the result looks really nice. In post processing I gave to the footage a little bit of a unnatural look, so it looks like rendered, but it is actually taken with a camera in 2 hours and another 2 hours for post processing.
In this video is also stated, that u don’t need fancy equipment like tripod, intervalometer and chalk marks on the ground for 1 km. It’s worth taking a look.
The few days in Kärnten, Austria where really “time lapsy”… So here another time lapse from the balcony in Kärnten withe view to Klagenfurt an the Karawanken mountains.
UPDATE: I’m glad to announce that I finally found the time to release the Night Fox Android App for my Shutter Speed Calculator!
![]()
This is the shutter speed calculator for night sky photographing. Basically you just insert the data of crop factor, the megapixel you want to archive or your camera has, the focal length and the tolerance of pixels you can accept. The description of all these different factors is below. The description of the whole process can be found here.
| Link |
Crop Factor
The crop factor is depending on your camera. It is influencing the field of view (FOV) of your camera, like the focal length also does. This calculator includes the factors 1 (3:2), 1.5 (3:2), 1.6 (3:2) and now also 2.0 (4:3). (Thx to Livio for the comment)
See also http://en.wikipedia.org/wiki/Crop_factor and http://en.wikipedia.org/wiki/Aspect_ratio_(image).
Megapixel
This is the amount of megapixels you want to achieve. It can be the maximum of your camera or also a lower Value. I included this value, because somebody may what to have the pictures not in full resolution, but a maximum of exposure time. With a smaller resolution I’m recommending to reduce the pixel tolerance as well.
Focal Length
The focal length is very important for the field of view and therefore how fast the stars are moving. The rule of thumb is “the lower the better”. But be aware of the speed of your lens. This influences the needed exposure time as well.
Pixel Tolerance
Depending on what you can live with, you can adjust this value. Basically it describes the tolerance of how many pixels a star can “move”. In some cases 20 pixels are OK, but for having really sharp stars, I recommend 10 pixel.
The Milky Way Exposure Calculator can be found here and as well as the other articles of http://www.lonelyspeck.com/.
After New Years Eve we got an invitation for a short ski holiday trip near Klagenfurt. I was able to shot some nice time lapses from the Karawanken mountains. The clouds coming Italy seem to fall like water over the mountains. Also i go a nice day to night transition withe the moon as light source on the mountains. The day to night transition was made with LRTimelape 3. For this tool are a lot of tutorials available and the free version is more or less full featured, except that the footage is restricted to 400 pictures.

Karawanken Mountain Chain Time Lapse von Thomas leber ist lizenziert unter einer Creative Commons Namensnennung 4.0 International Lizenz.
Beruht auf dem Werk unter https://www.jamendo.com/en/track/654856/sombre.

Night Sky at the Alois Günther Haus
Recently I wanted to improve my skills in night sky photographing. So I opened the PC and asked Google a lot of questions. I was reading a lot about shutter speed, focal length and exposure adjustment. A very good site I found was How to Photograph the Milky Way of the site www.lonelyspeck.com. They created a very good tutorial and answered many of my questions. They also created the Milky Way Exposure Calculator, witch lets you calculate how a lens may perform on your camera. For ranking the lenses they calculate a score, basically from the physical parameters of the lens. I agreed with the majority of the parameters, but I was wondering if the slowest possible shutter speed is maybe a bit inaccurate.
In night sky photography the shutter speed is mostly longer than 5-10 s or even more. Without a tracking device the stars will move over the sky and produce, depending on the shutter speed, streaks on the picture. But we want actually a clean image of the stars. So what we need is a lens with a short focal length and an aperture which should have less than f/2 to gather a lot of light. The basics can be checked in the links above. Anyway, the rule of thump for the shutter speed, 500/focal length, seems a bit inaccurate and, as stated there, also not completely usable for APS-C cameras. So I started to think, how can this be solved better…? I was drawing some sketches and made some calculations and concluded: there might be a better and more accurate way: I started to research about what information are available for all lenses and cameras. I concluded that the sensor size and the focal length is available in any case. The angle of view was not all the time available or I just couldn’t find it. Anyway, with the sensor size and the focal length we can calculate the angle of view with the following equation:

In this equation, d is the diameter of the sensor and f is the effective focal length. Since f is depending on the focus, the focal length F of a 50 mm lens is only 50 mm when set to Infinity. Since in astro photography we use only the infinity setting we can assume f = F. So we can also calculate the horizontal and vertical angle of view for a lens. In this case I will just use the stock Canon EF-S 18-55mm 1:3.5-5.6 IS II on a EOS 600D with 18 MP as example. Why we need the horizontal and the vertical angle of view, will be pointed out later. With the pixel count on the camera we can now calculate the angle to pixel ratio. The 600D has 18 MP with a 3:2 ratio. This leads to a pixel count of 5.184 px by 3.456 px. The pixel to angle ratio is calculated by α / Σnpixel. The diagonal pixel count is just calculated by Pythagorean theorem.
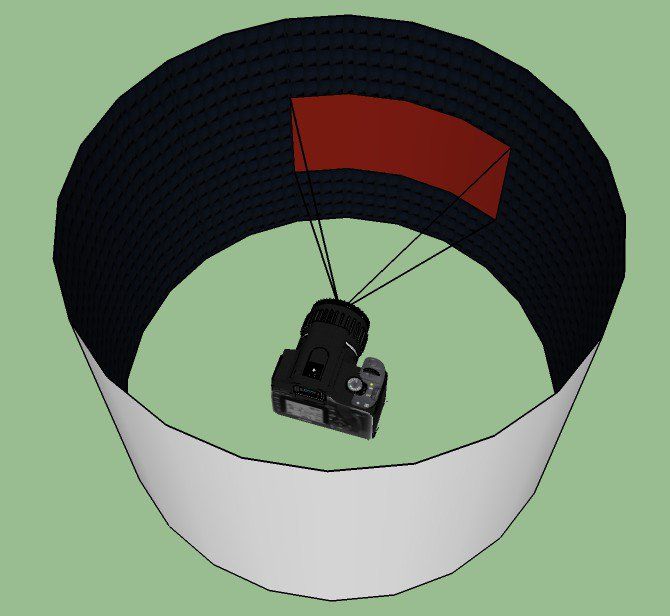
The night sky can be seen as a cylinder rotating around the camera.
The next assumption we make is that the sky is rotating around the world. I know that some people will now say “NO! Galileo was very clear with that!”. Yes its not true but since we focus anyway on infinity and the sky is more more less a flat area for the lens, this is ok. This lead so my next assumption. The sky is not a sphere, its like a cylinder. The picture demonstrates this assumption. The cylinder rotates with the angular speed of 360° per 24h or 0.00417 °/s. Depending on the pixel to angle ratio we can now calculate the minimum shutter speed. In case of my 18 mm focal length the numbers are very small and and seem not right.
But this is only the half truth. Since the stars are not only one pixel big, we can use a threshold. For example a threshold of five pixels will give us five times the shutter speed. In my test, five pixel threshold was mostly ok and not really visible. Somebody who wants to have more clear pictures can reduce the threshold.
I’ll program a calculator using javascript in the near future and upload it to this website. Stay tuned!
I’ve tried to make a HDR timelapse… unfortunately, the result is not like expected. The exposure times are not well choosen (1/60, 1/80, and 1/125; 2,0,-2). So the areas in the bottom are dark. But at least the sky has a nice color.
I had a chance to record a longer time lapse at the Hohe Wand near Vienna. After a short check of the weather conditions we decided to take the risk and we were successful! 🙂
We found a little field where we build up our equipment and started the timer. So this is the result:
For a final video i need truly more sequences, but i’m working on that.
Just to be complete: I used as usual my Canon EOS 600D with Magic Lantern and the standard 18-55mm IS II. No filters or other equipment was used with the camera.
This is the, i think, somehow impressive star time lapse at the Alois-Günther-Haus. As I said, i used the standard 18-55mm IS II and my Canon 600D. I’ve Magic Latern installed on my camera, to get the interval mode and some other useful features. I also did some tricks and tweaks with Photoshop and After Effects.